Referral spam: attack patterns and countermeasures
Incoming traffic is one of any website’s key success indicators. Operators use metrics such as hits, visits, and page impressions to measure visitor flow and to evaluate the performance of a web project. Log file analyses provide the operator with this information. In addition, website operators use web-based software solutions such as Google Analytics, Piwik, or etracker to record and analyse traffic data. If anomalies occur, this could come down to referral spam (also known as referrer spam). We will show you how to detect spam attacks like these and prevent any future statistics from being falsified.
What is referral spam?
Referral spam is a form of search engine spamming where hackers try to manipulate log files and analysis statistics of certain websites. The aim is to generate so-called fake traffic, to simulate visitor flow, or to lead people to their own website. Both attack patterns rely on extensive independent computer programs – bots (short for 'robots').
What are spam bots?
Computer programs, which automatically perform repetitive tasks, are a big part of the World Wide Web as we know it today. Search engines like Google or Bing use programs like these to search the web and index relevant sites. These are known as web crawlers or search bots.
But hackers also use bots to automate their web activities. Unlike search engine crawlers, the focus is not on user interest, instead, these programs are used in spam attacks to…
- Automate clicks on advertisements (Click fraud)
- Collect e-mail addresses (Email-Harvesting)
- Create automatically generated user accounts
- Distribute advertising in the form of automatically generated comments
- Spread malicious software
Referral spam is also usually bot-supported. There are two classes of spam bots:
- Programs that simulate website visits: this type of spam bot imitates common web browsers such as Chrome, Firefox, or Safari and sends masses of HTTP requests to selected web servers. These programs are similar to the crawlers of search engine operators that sometimes disguise themselves as web browsers. Since these programs simulate how a human visitor would behave on the website, this type of attack is called crawling spam. The effects of crawling spam are visible in the server log file. This is known as log file spam.
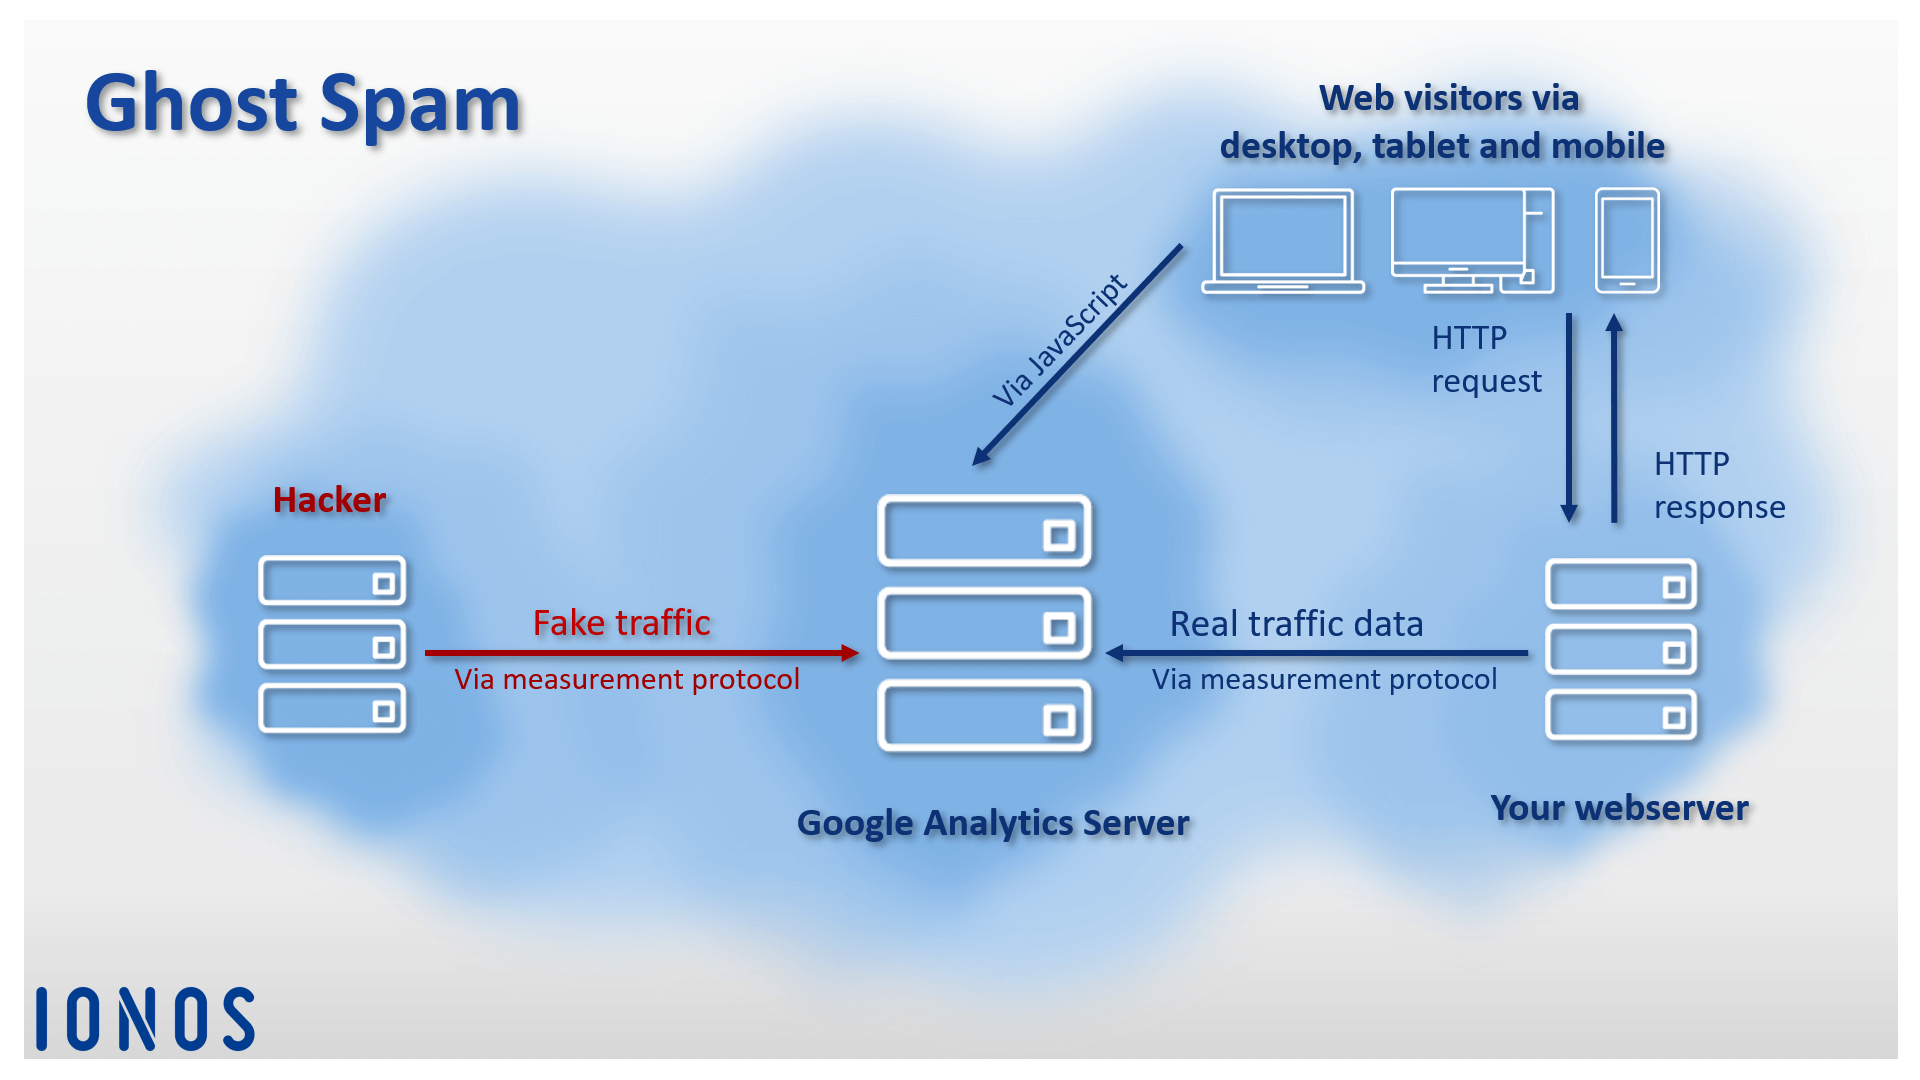
- Programs that falsify traffic data: spam bots of this type imitate traffic data from other websites and feed them into the servers of established web analytics tools. Attack patterns like these make it possible to manipulate web statistics without interacting with the target page. This attack pattern doesn’t appear in the server log file, it only turns up in the reports by the manipulated analysis software. This is known as ghost spam.
We look at both attack patterns in detail and introduce the countermeasures that can be taken.
Crawler-Spam
Most web servers have a central log file (the access log), in which each time it is accessed is logged in chronological order with time stamps. The following example shows the Access Log entry of an Apache server in Combined Log Format:
127.0.0.1 - frank [10/Oct/2000:13:55:36 -0700] "GET /apache_pb.gif HTTP/1.0" 200 2326 "http://www.example.com/start.html" "Mozilla/4.08 [en] (Win98; I ;Nav)"
The entry contains the following information:
| Information | Example |
|---|---|
| Requesting host’s IP address | 127.0.0.1 |
| Username for HTTP authentication | frank |
| Time stamp | [10/Oct/2000:13:55:36 -0700] |
| HTTP request | GET /apache_pb.gif HTTP/1.0 |
| HTTP status code | 200 |
| File size | 2326 |
| Referer [sic] | http://www.example.com/start.html |
| User agent | Mozilla/4.08 [en] (Win98; I ;Nav) |
Hackers use automatic logging via log file to infiltrate their own URL into the server protocols of selected websites by mass distributing HTTP requests. In the foreground, you can see the referer field [sic] of the HTTP request. This includes the URL of the referring website.
due to a spelling error in the HTTP specification, the spelling 'referer' has been established for the corresponding field in the HTTP header. In other standards, the correct spelling with a double 'r' is used.
If an internet user clicks on one of the hyperlinks, they will be forwarded from the current webpage to the specified target page in the link. The referrer contains the URL of the website where the link is located. Thanks to a log file analysis, the operator of the landing page can find out which websites link to their project and can identify potential traffic sources.
In the past, it was common for bloggers to publish referrer information from the log file in a widget on their own website so they could display where visitors were coming from. This would usually be in the form of a link to the traffic source. Hackers used this practice as an opportunity to manipulate the log files of blogs and other websites in order to position their own web projects as far up as possible in the public link lists, and generating backlinks and page views by doing so.
Even today, special spam bots are used that request target pages in their masses and pass on the website’s URL (whose visibility is to be strengthened) onto the servers. Spam attacks like these, however, have declined sharply. One reason for this is that auto-generated referrer lists on websites are scarce nowadays. This depends on whether essential changes have been made to Google’s ranking algorithm. Since the Penguin update in April 2012, Google has started looking more closely at web spam when it comes to backlinks. Over-optimised web projects now face penalties. An example is when websites have many backlinks from irrelevant sources, link lists, and networks, article directories, or blog comments.
Log file analyses nowadays are rarely manual. Instead, tools like Webalizer, AWStats, or Piwik are used. In addition, web analytic programs such as Google Analytics are able to evaluate traffic data without accessing the server’s log files but they aren’t any less vulnerable to crawler or ghost spam.
Identifying crawler spam
In the following section, we show you an example of how to use Google Analytics to recognise crawler spam in your website project and how to filter out suspicious referrers.
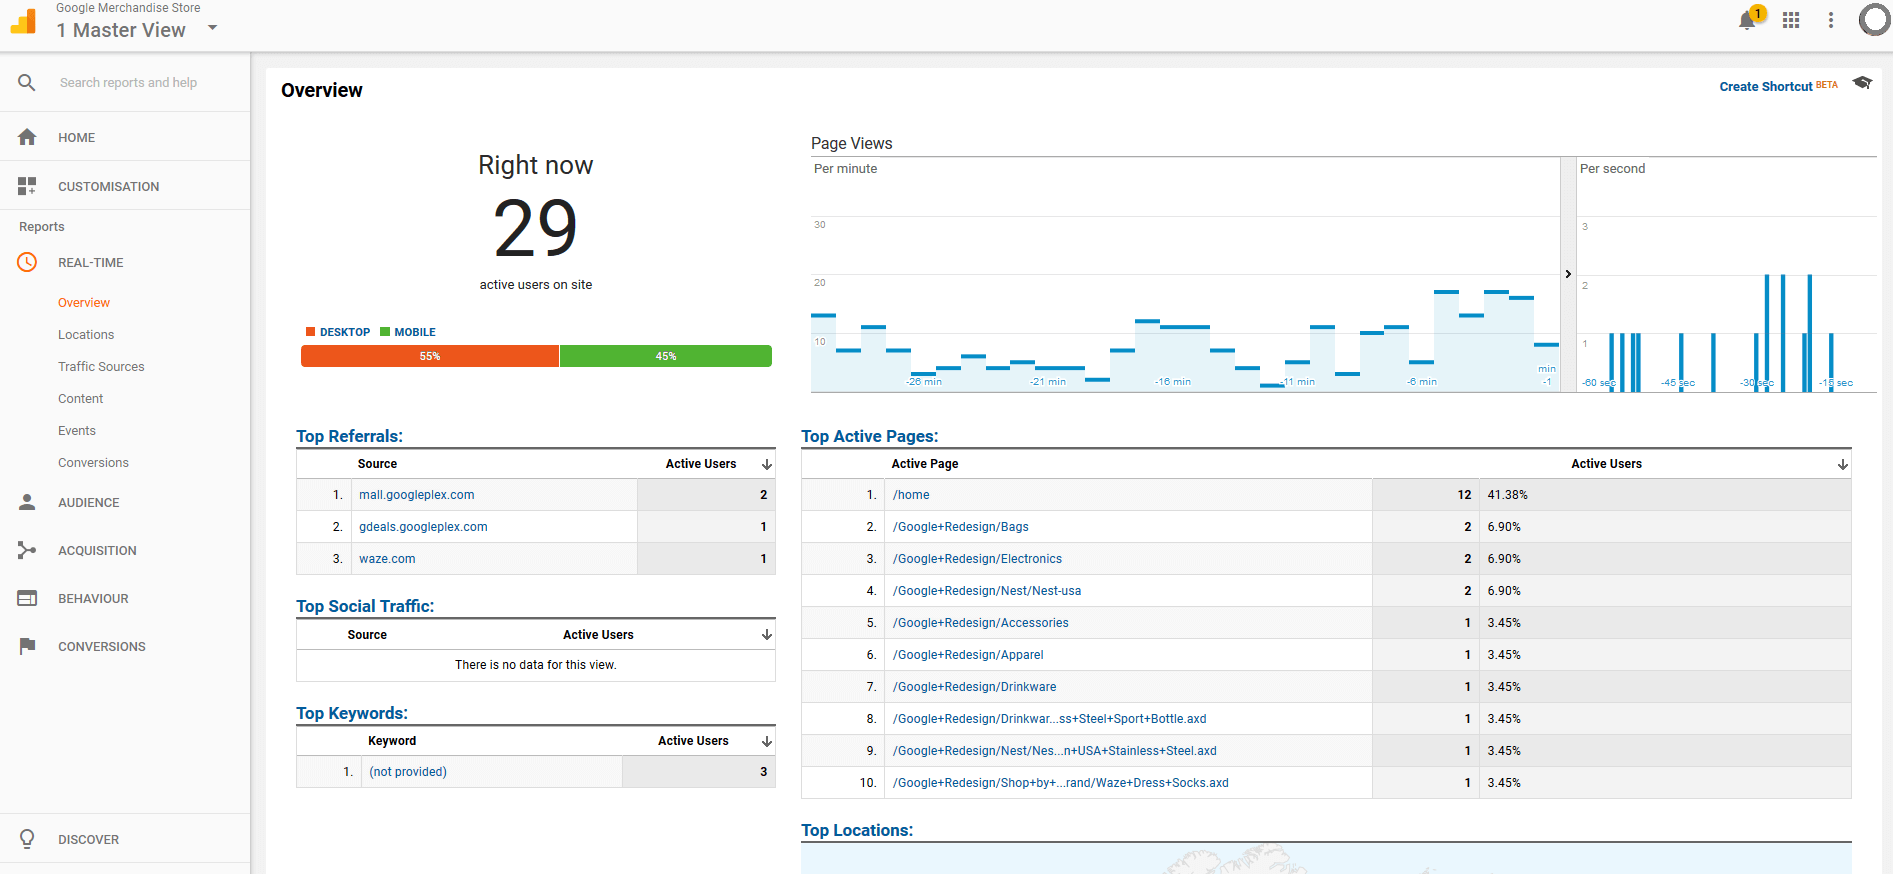
1. Open the Google Analytics account: Open your web project’s Google Analytics account
All screenshots from the Google Analytics web view are from the Google Merchandise Store, which the provider offers as a demo. The link to the account can be found on the Google Analytics help page. You require a free Google account for access.
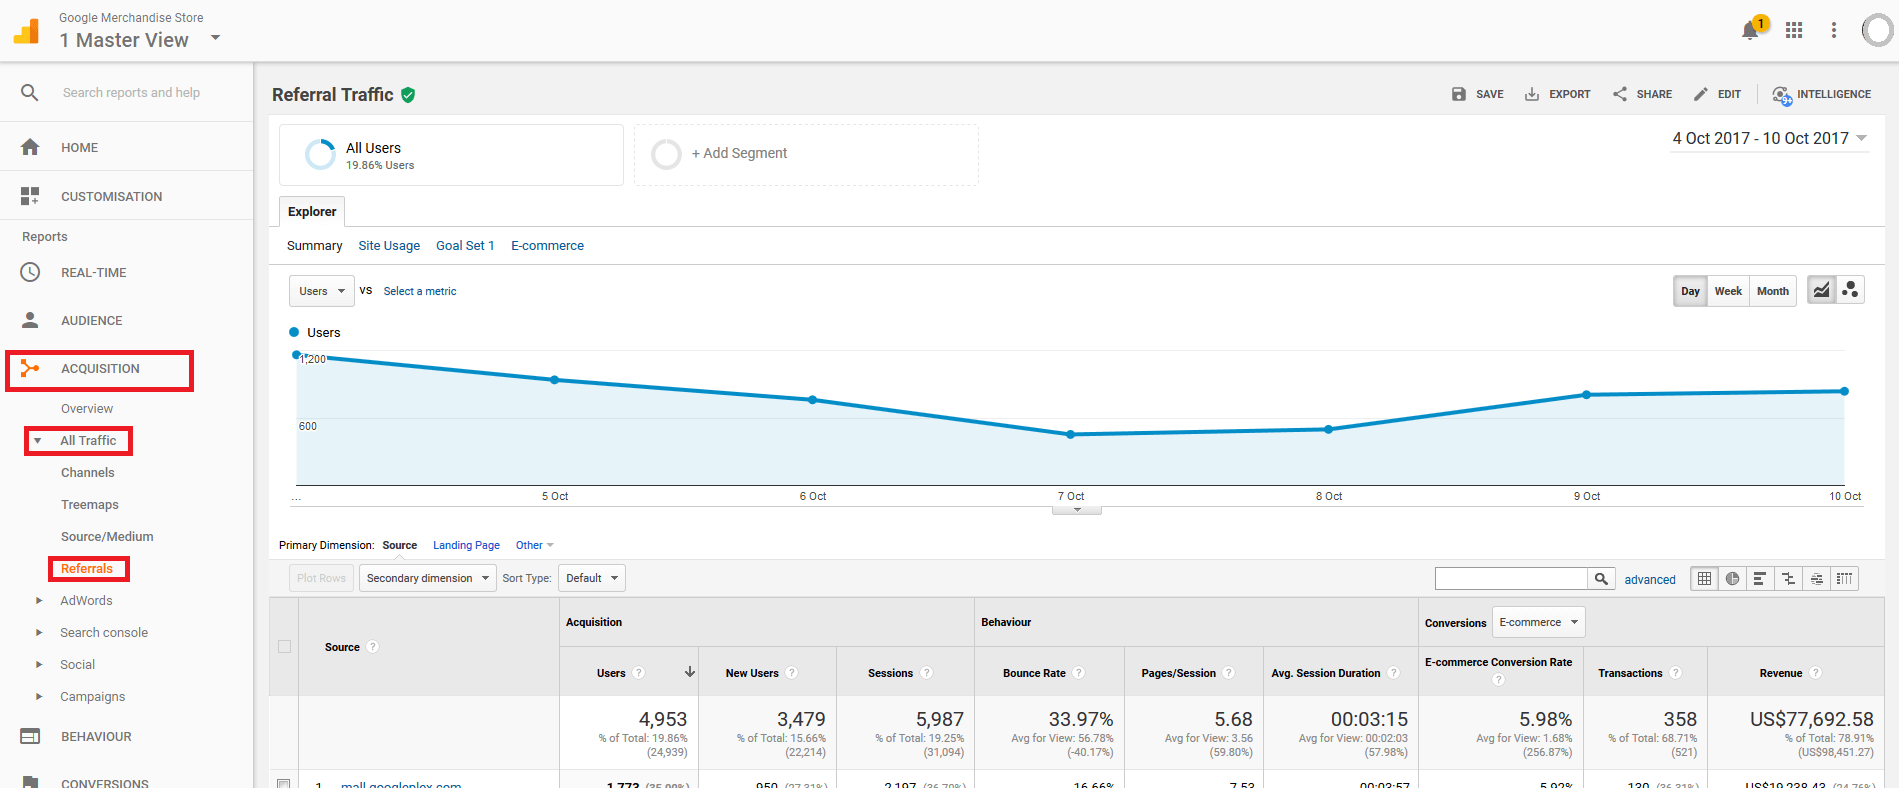
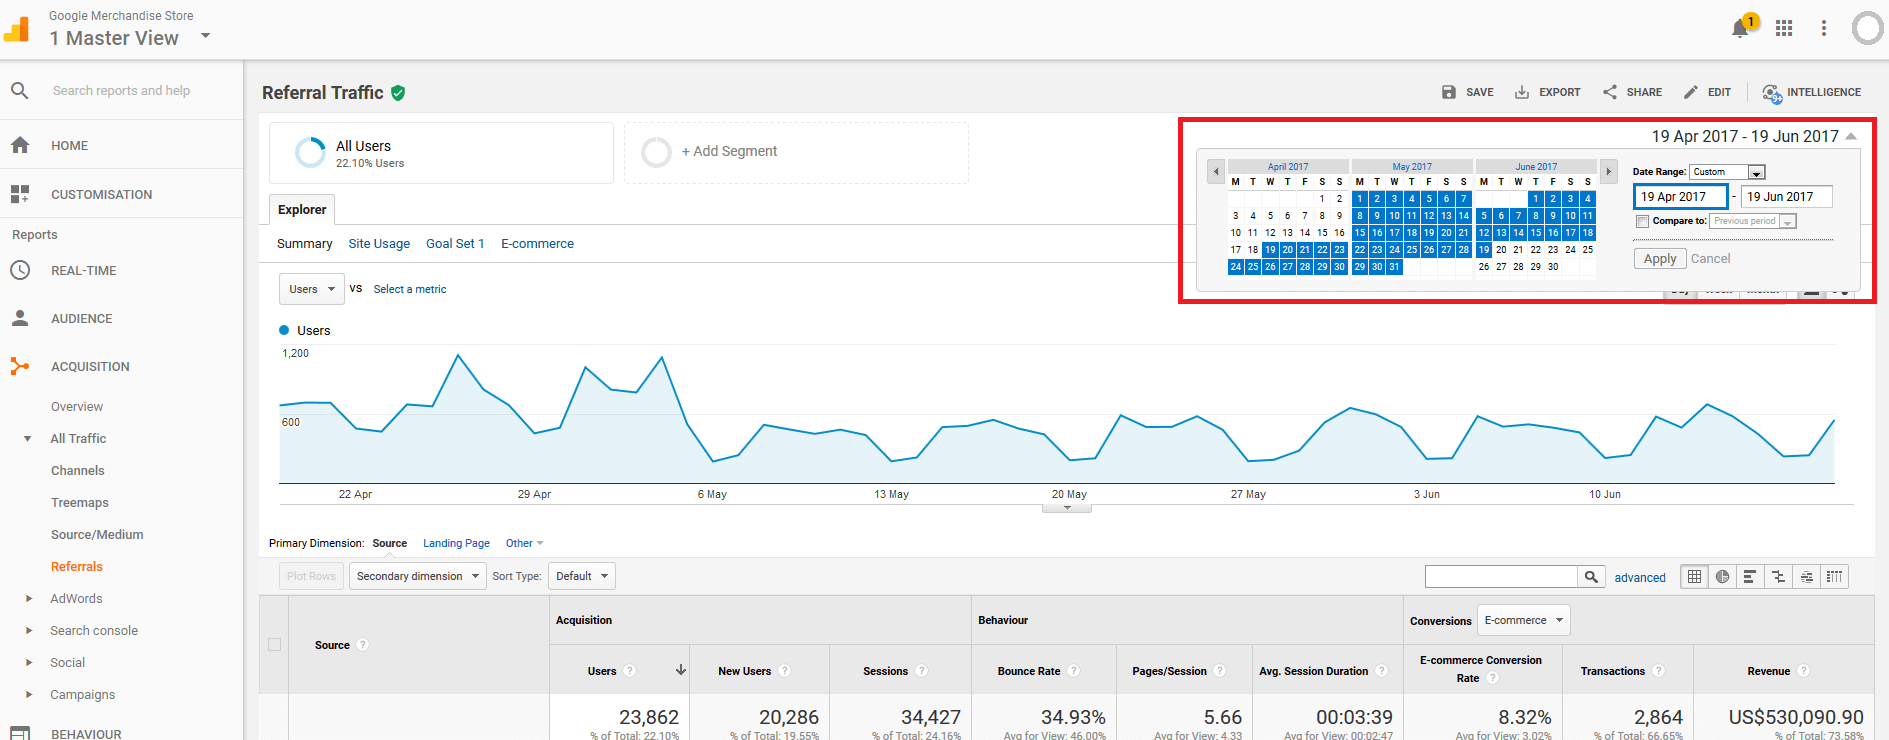
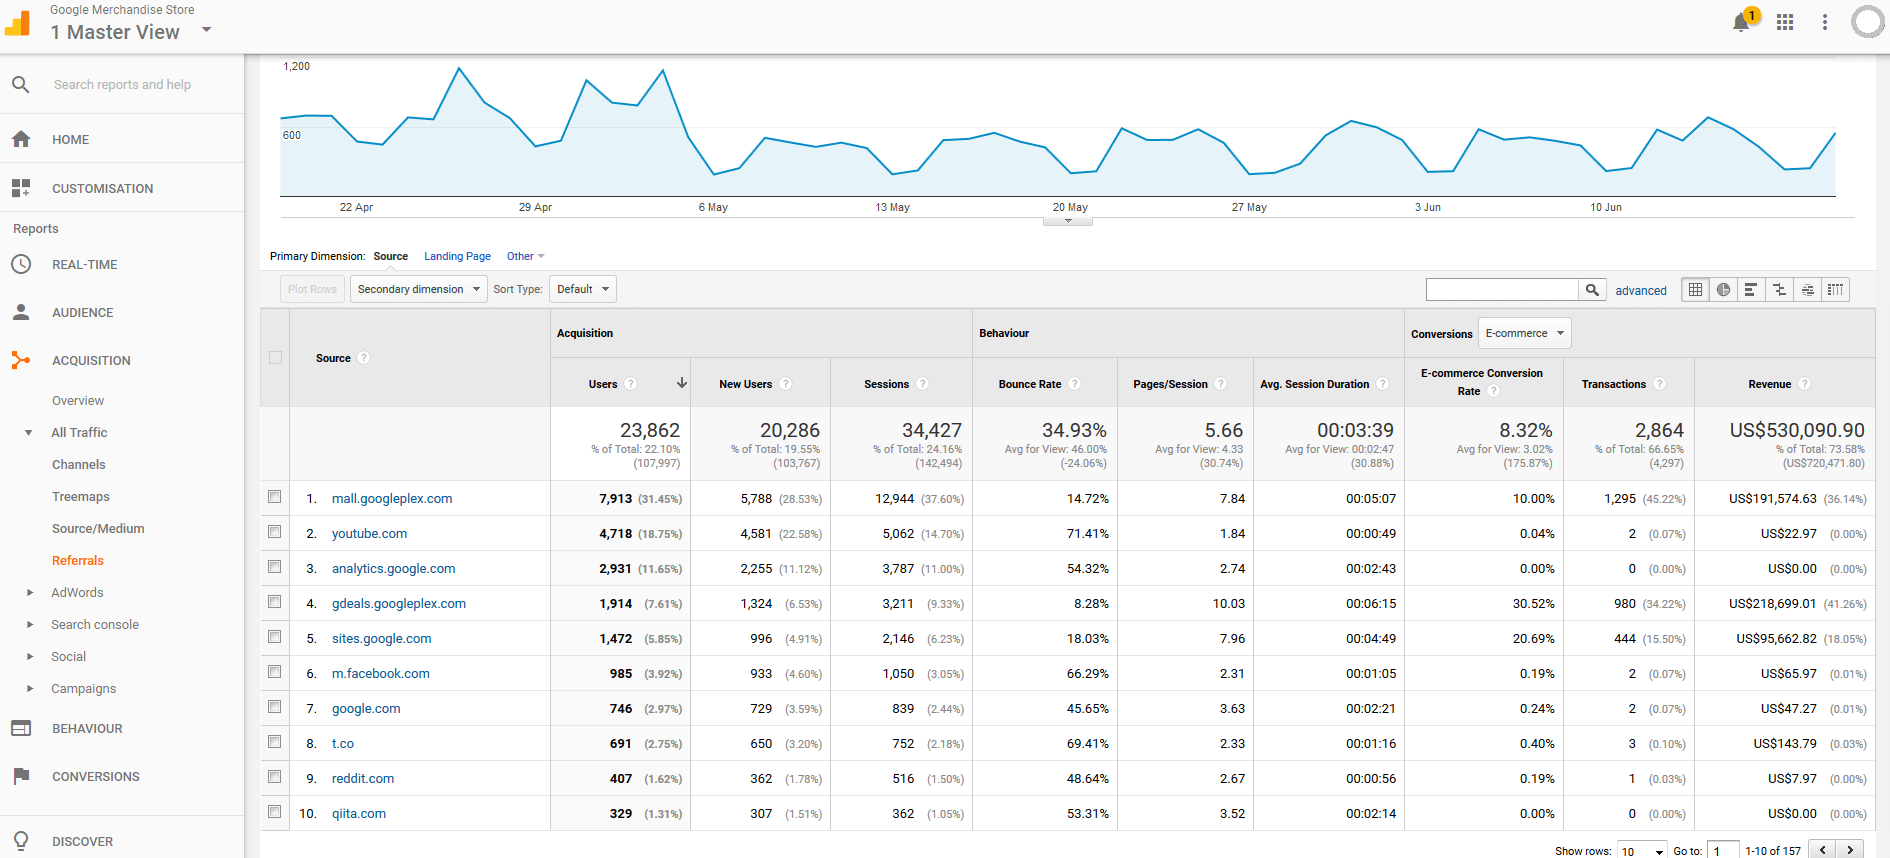
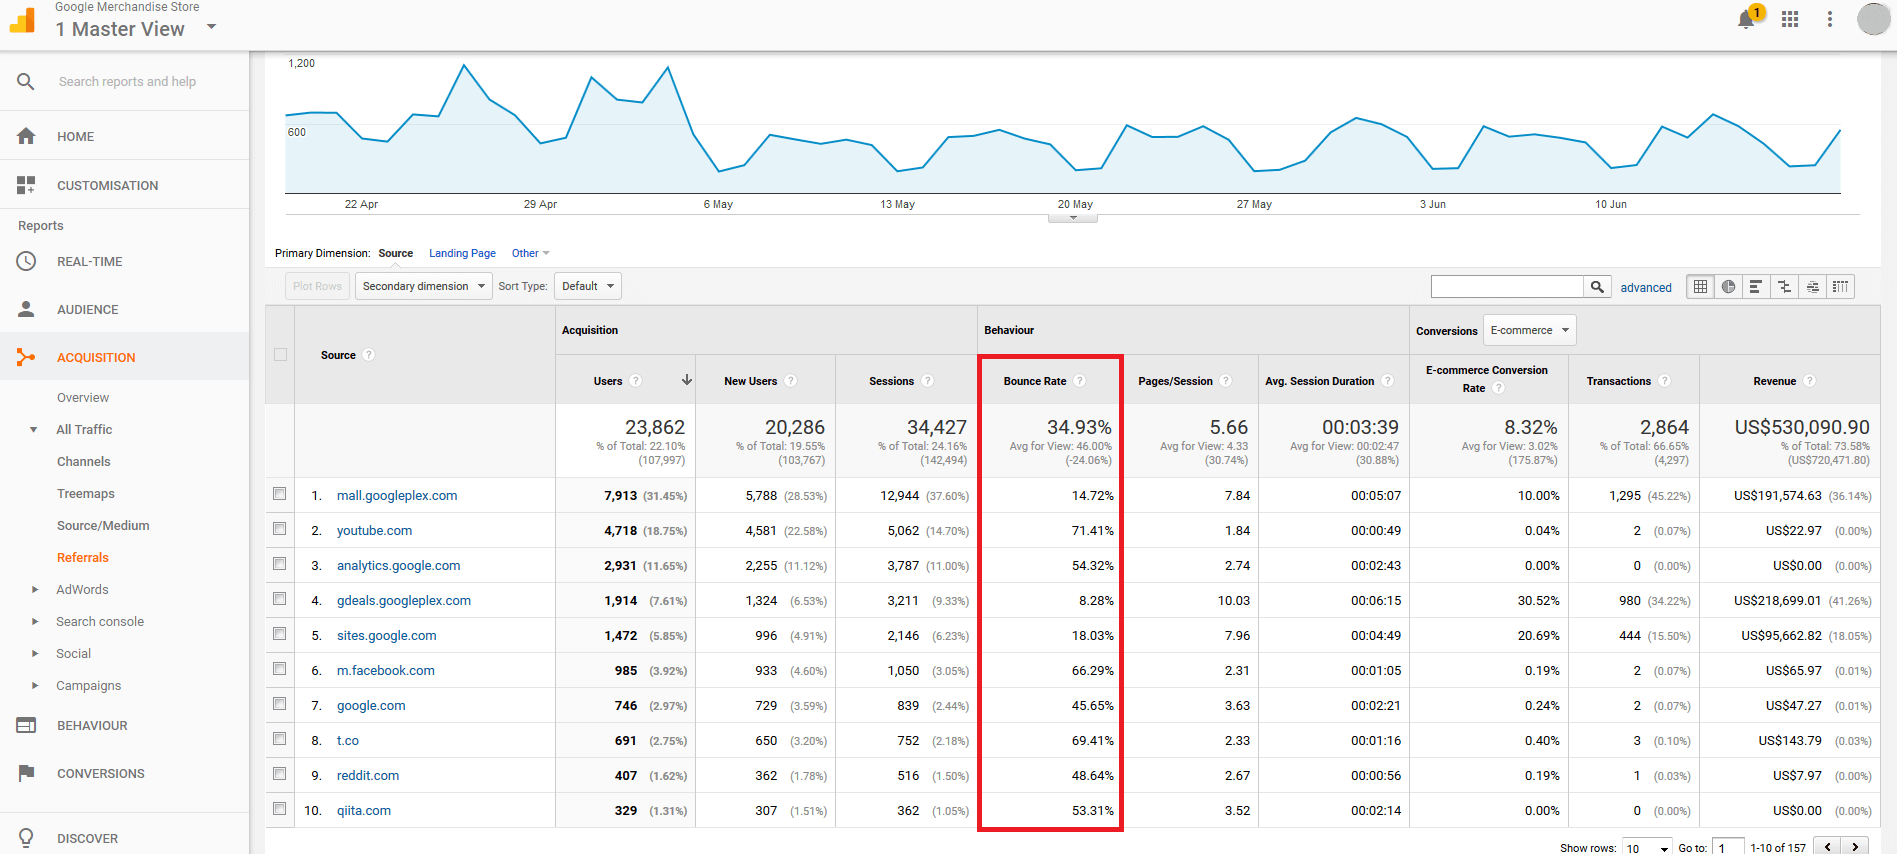
4. Organise/filter referral statistics: Under 'Acquisition' > 'All Traffic' > 'Referrals', Google Analytics displays all link sources of inbound links to your site in a summary report. This gives you a list of all referral URLs recorded by Google Analytics during the selected viewing period, as well as the respective figures that can be assigned to these URLs.
For every referral, Google Analytics reports the number of users and sessions generated by this link. In addition, the average bounce rate, the number of pages viewed per session, the average duration of a session as well as conversion rates, transactions, and revenue can be read from the statistics.
When it comes to spam prevention, the number of sessions per referral source, as well as the average bounce rate are important.
Under 'Behaviour', you will notice the 'Bounce Rate' and if you click on the percentages, you can change the way in which they are displayed.
The bounce rate is a percentage that tells you how many page views came from the source without interacting with your website. A bounce rate of 100 or 0% for more than 10 sessions, which comes from the same referral source, is a clear sign that these are automatic queries.
Alternatively, you can use 'Regular Expressions' (RegEx) to filter the view for known spam referrals. These include, for example, the following websites:
- semalt.com
- darodar.com
- hulfingtonpost.com
- buttons-for-website.com
- best-seo-solution.com
- free-share-buttons.com
The Dutch digital agency, Stijlbreuk, has provided an extensive referral spam blacklist on referrerspamblocker.com.
A corresponding filter pattern could, for example, look like this:
semalt|darodar|hulfingtonpost|buttons-for-website|best-seo-solution
The pipe (|) stands for or. Meta characters like periods (.) need to be masked with a pre-defined backslash (\).
To use the filter, click on 'advanced' in the menu bar, which is above the table.
Create an inclusive filter for the source and select 'Matching RegExp' in the drop-down menu entitled 'Containing'. Insert any regular expression as a filter pattern. Confirm the filter process by clicking on 'Apply'.
5. Note down suspicious referrals: Create a referral spam blacklist so that you can enter all the suspicious source URLs. You can then use this list later as a basis for an exclusion filter.
Block crawler spam via .htaccess
Crawler spam requires a visit to your website in order to be successful. Reliable countermeasures can be initiated on the server-side. We show you how to do this with the configuration file .htaccess of the world’s most used web server, Apache.
If you notice suspicious URLs in your referral statistics, the following procedures can be used to prevent spam bots from accessing webpages:
- Block referrals
- Block IP addresses
- Block user agents
Block referral via .htaccess
In order to block selected referral URLs, open the .htaccess files of your web server and add the following section of code:
RewriteEngine on
  RewriteCond %{HTTP_REFERER} ^https?://([^.]+\.)*semalt\.com\ [NC,OR]
  RewriteCond %{HTTP_REFERER} ^https?://([^.]+\.)*darodar\.com\ [NC,OR]
  RewriteCond %{HTTP_REFERER} ^https?://([^.]+\.)*hulfingtonpost\.com\ [NC,OR]
  RewriteCond %{HTTP_REFERER} ^https?://([^.]+\.)*buttons\-for\-website\.com\ [NC,OR]
  RewriteCond %{HTTP_REFERER} ^https?://([^.]+\.)*best\-seo\-solution\.com\ [NC,OR]
  RewriteCond %{HTTP_REFERER} ^https?://([^.]+\.)*free\-share\-buttons\.com\ [NC]
RewriteRule .* - [F]
The server-side spam protection is based on the RewriteRule:
.* - [F]This instructs the web server to answer all incoming HTTP requests with the status code 403 Forbidden, providing one or more conditions (RewriteCond) are met. Access to spam bots is therefore no longer possible.
In the current example, each referral that is to be blocked, is defined in a separate RewriteCond as a regular expression, as shown in the following example:
RewriteCond %{HTTP_REFERER} ^https?://([^.]+\.)*semalt\.com\ [NC,OR]The condition is considered fulfilled if the server variable %{HTTP_REFERER} matches the regular expression defined in the RewriteCond – for example:
^https?://([^.]+\.)*semalt\.com\ The individual conditions are connected by the [OR] flag in the sense of a logical or. Therefore, only a RewriteCond must be fulfilled in order for the RewriteRule to be used. The [NC] flag defines the previous string as not case-sensitive.
Alternatively, you can define certain keywords in the RewriteCond, which will be excluded if they appear in the referral of an HTTP request. The following example blocks all HTTP requests whose referrals include one of the keywords: porn, pill, or poker.
Keywords should be provided with word boundaries using RegEx. Use the meta character \b for this.
RewriteEngine on
RewriteCond %{HTTP_REFERER} \bporn\b [NC,OR]
RewriteCond %{HTTP_REFERER} \bpill\b [NC,OR]
RewriteCond %{HTTP_REFERER} \bpoker\b [NC]
RewriteRule .* - [F]
Excluding keywords with word boundaries does come with its disadvantages. HTTP requests will be blocked even if the letter combinations defined in the RewriteCond are used, however, in a totally innocent context. Such examples of HTTP requests would be the following websites:
www.foodporn.com/
http://www.drink-overspill.com/
Block IP addresses via .htaccess
Are you finding that spam attacks keep coming from the same internet addresses? In this case, it is a good idea to disable the corresponding IPs or entire address range using .htaccess.
If you want to block just a single IP address on the server-side, insert a code block into your .htaccess file as shown in the following example:
RewriteEngine On
Order Deny,Allow
Deny from 203.0.113.100
Allow from all
All HTTP requests originating from the IP address 203.0.113.100 will be automatically rejected in the future. A code block like this can contain any number of IP addresses. List them like this:
RewriteEngine On
Order Deny,Allow
Deny from 203.0.113.100
Deny from 192.168.0.23
Allow from all
If you want to block an entire address range from accessing your website, write it down in the CIDA format (Classless Inter-Domain Routing) as follows:
RewriteEngine On
Order Deny,Allow
Deny from 198.51.100.0/24
Allow from all
All requests from IP address 198.51.100.0 to 198.51.100.255 will be blocked.
Take into consideration: Hackers generally use botnets to query target pages in a very short time via a variety of different IP addresses. This makes it virtually impossible in practice to prevent spam access via IP address blocking.
a botnet is a network of infected computers (so-called zombie PCs) that is used as a basis for spam attacks or for sending malicious software. In order to create a network like this, hackers (so-called botmasters) use their computers to inject malicious programs over the internet into computers that aren’t secured properly. They then use their network resources to carry out attacks on other internet users. Botnets are usually centrally controlled and are the starting point for massive spam waves and large-scale DDOS attacks.
Block user agents via .htaccess
Another way to prevent spam attacks is to block certain user agents whose identity is used by spam bots to pretend to be legitimate visitors.
To do this, you create a code as follows:
RewriteEngine On
RewriteCond %{HTTP_USER_AGENT} Baiduspider [NC]
RewriteRule .* – [F,L]
In the past, website operators repeatedly recorded access attempts made by spam bots that were pretending to be search bots from the Chinese search engine, Baidu (Baiduspider). If you’re not expecting any traffic from China to come to your site, you can safely block this crawler to prevent spam attacks.
Google-Analytics-Filter
The server-side spam prevention via .htaccess is the most sustainable way to prevent crawler spam. However, adapting .htaccess is complex and prone to errors. Not every website operator dares to formulate their own rewrite rules. This is for good reason because any errors made can have a serious impact on a website’s availability. Alternatively, automatic spam bots can be filtered out of the statistics of the analysis program being used, which will then prevent inaccurate reports. We will show you how Google Analytics works with this example.
Google Analytics offers you two options for filtering referral spam out of the view.
- Google’s referral spam blacklist
- Custom filters
The following YouTube video is part of the 'Digital Analytics Fundamentals Course' by the Analytics Academy, and offers an introduction to Google Analytics’ filter function:
Google’s referrer spam blacklist
Google has also recognised the problem of referral spam when evaluating user statistics. Therefore, all known bots and spiders can be filtered out automatically. To do this, follow these steps:
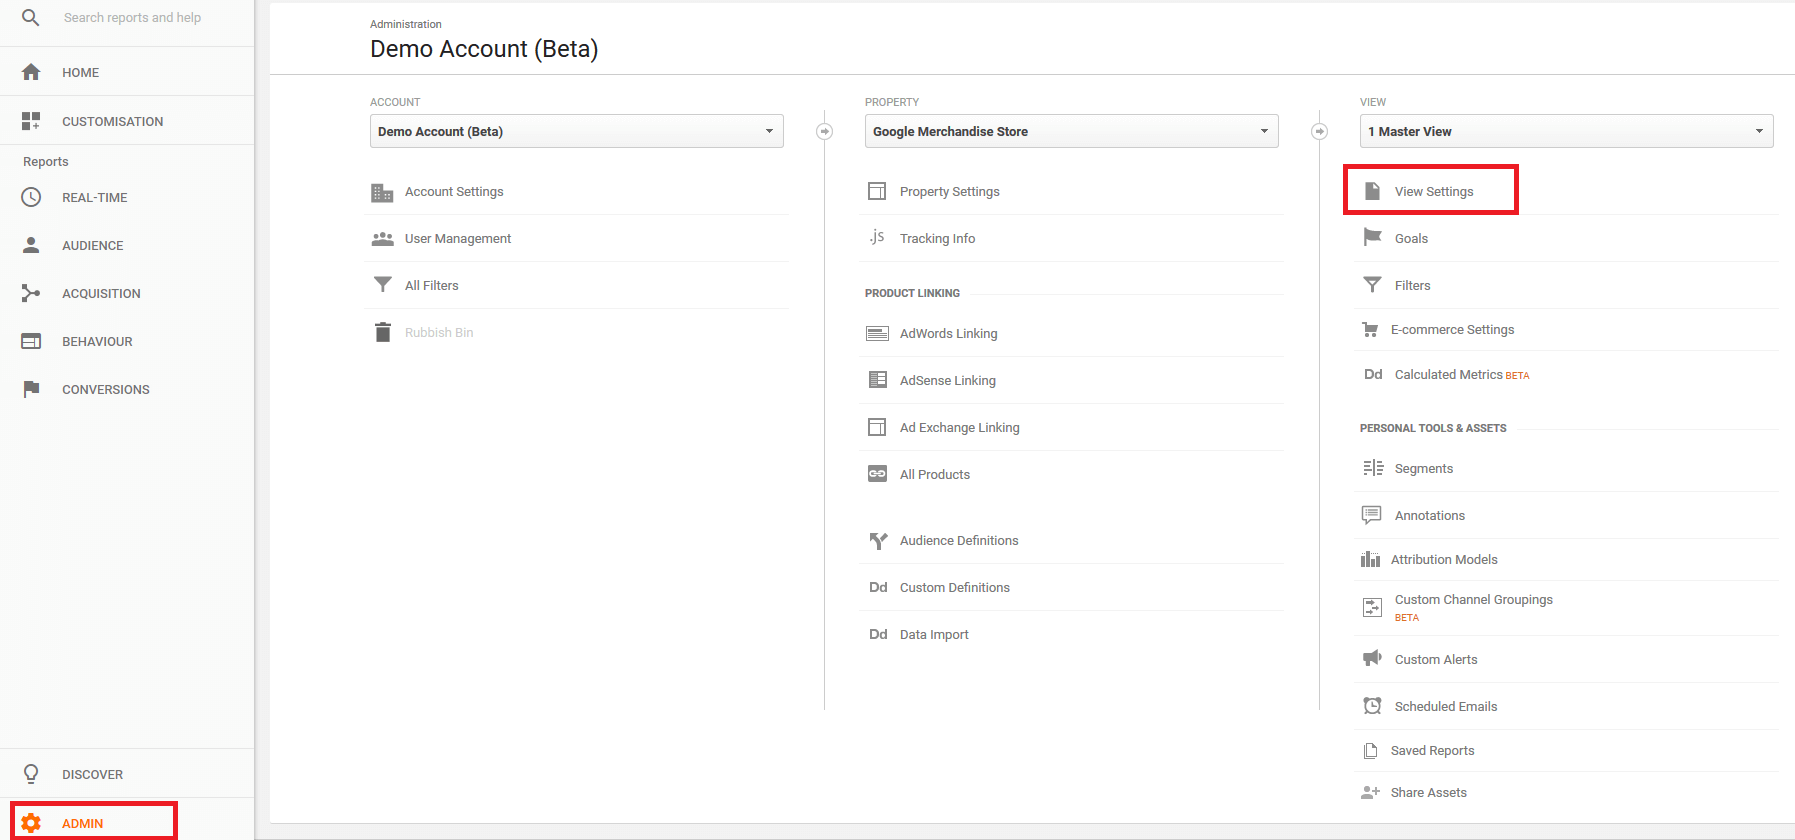
1. Open the view settings: Open your Google Analytics account and click 'Admin' in the menu on the left. Next, select 'View Settings'.
Google now shows you a cleared up version of your website statistics.
Take into consideration: Only the user data, which the tool recognises as spam, can be filtered out. The filter only refers to the bots and spiders listed in Google’s referral spam blacklist.
Custom filter
Google Analytics also enables you to define filters on an account level or on a display level. Filters that are defined on an account level can be applied to one or more data sets as needed. If a filter is created on a display level, it is only valid for the selected view.
You should test newly created filters by applying them to a copy of the desired view. Follow the steps below.
1. Create a copy of the view: Click on 'Admin' then under 'View' you should click on 'View Settings' and copy the view.
Name the copy whatever you wish, and confirm the process by clicking the copy button.
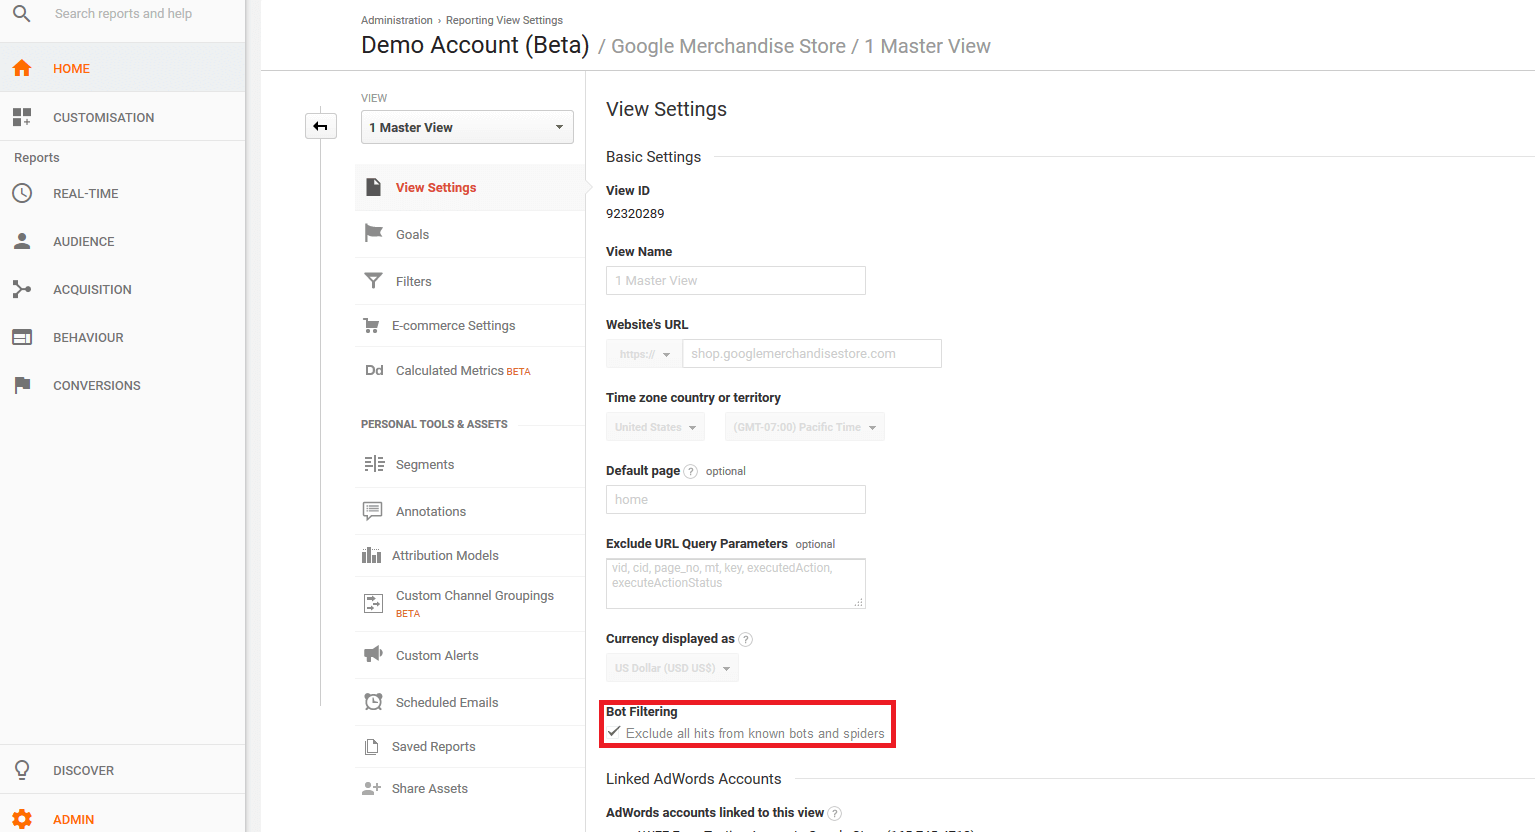
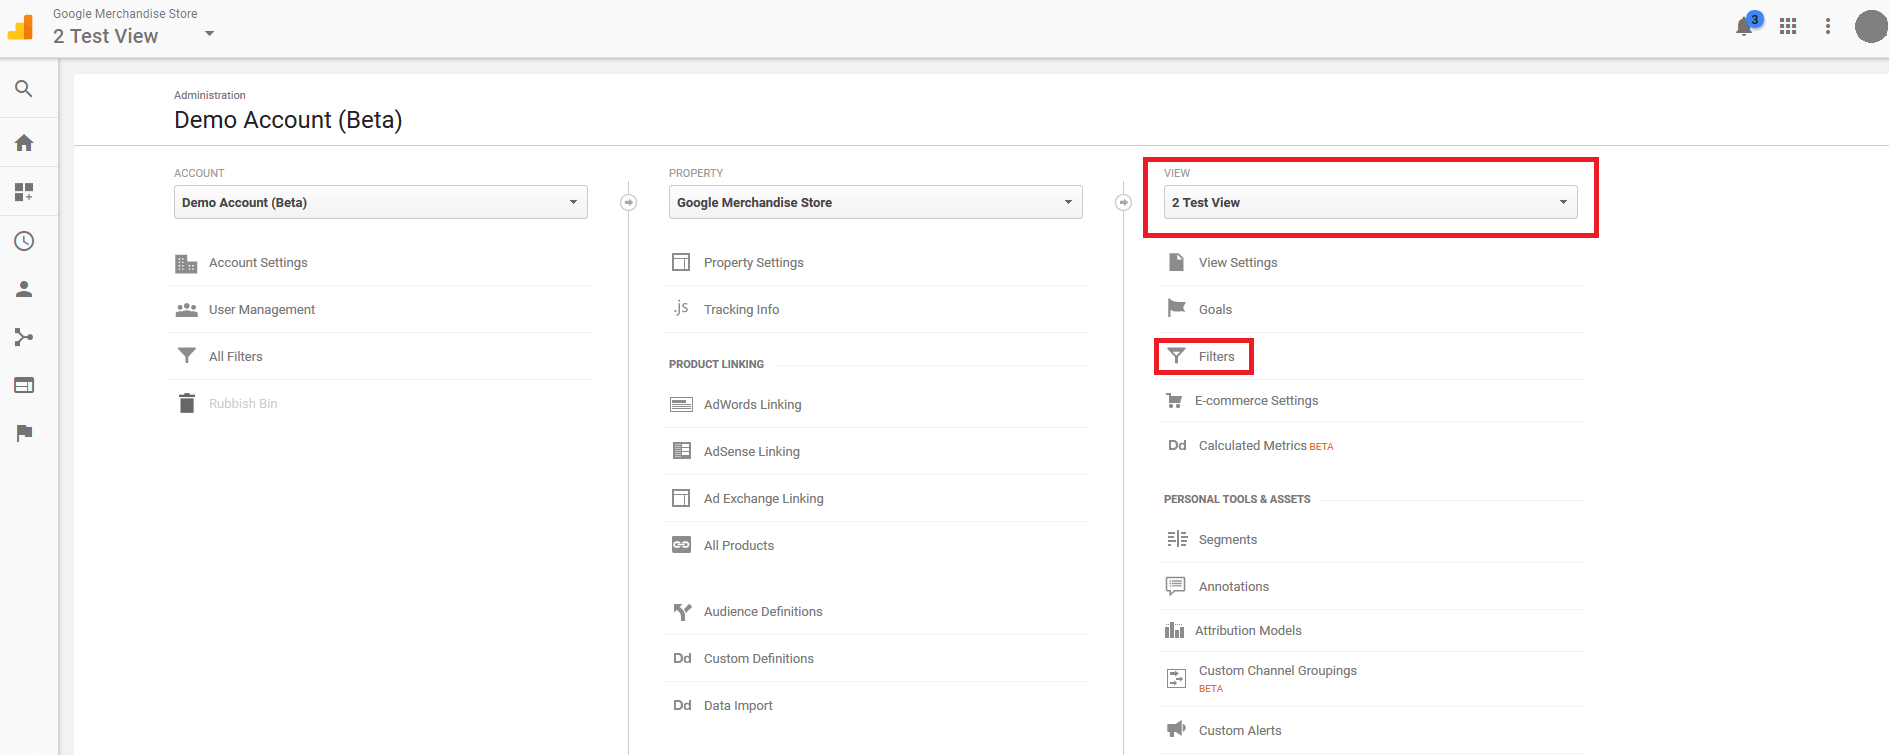
2. Define a custom filter: Select 'Admin' > 'View', then select the copy you just created and click the menu item, 'Filters'.
If you have already created filters for this view, Google Analytics will show you these in the overview.
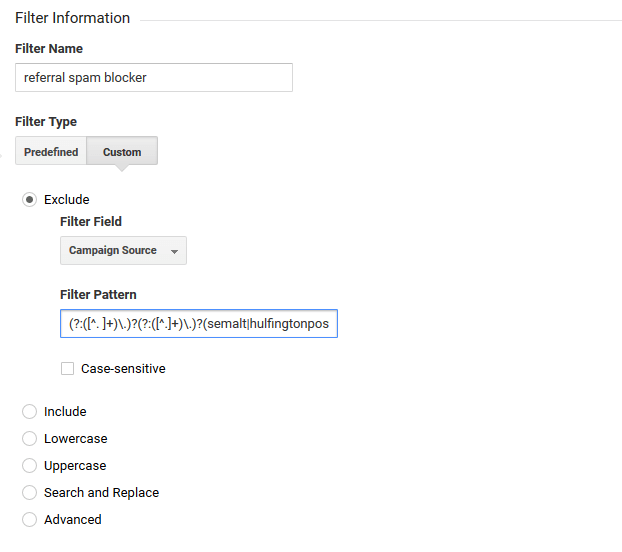
To define a new custom filter, click on 'Create New Filter', then give it a name, for example, referral spam blocker.
Under 'Filter Information', select the following options:
- Filter Type: 'Custom'
- Exclude'
- Filter Field: 'Campaign Source'
The field name 'Campaign Source' determines the source dimension for Google Analytics reports.
You can now define a filter pattern in the form of a regular expression. Use your previously created referrer spam blacklist. A filter pattern like this could be as follows:
(?:([^. ]+)\.)?(?:([^.]+)\.)?(semalt|hulfingtonpost|buttons-for-website|best-seo-solution)\.(com|de|net|org|ru)3. Verify the filter: It’s possible to check to see how the filter affects the current view.
The verification only works if the selected view contains enough data.
Click on save to complete the filter set-up. The newly created exclusion filter is displayed in the overview.
4. Apply filters to the main view: If your custom filter is working as desired, apply it to the main view of your Google Analytics account.
Data filters are a great way of cleaning up your analysis reports from referral spam. Be aware that the Google Analytics filter option only hides traffic caused by bots. It doesn’t solve the actual problem of your server being overloaded by spam attacks. Sustained spam prevention should be carried out through server-side measures that prevent spam bots from accessing websites.
Block referrer spam via WordPress plugin
WordPress operators can protect their site against crawler spam using plugins. The corresponding third-party software is available for free on the WordPress website.
The most popular referral spam WordPress plugins with regular updates are:
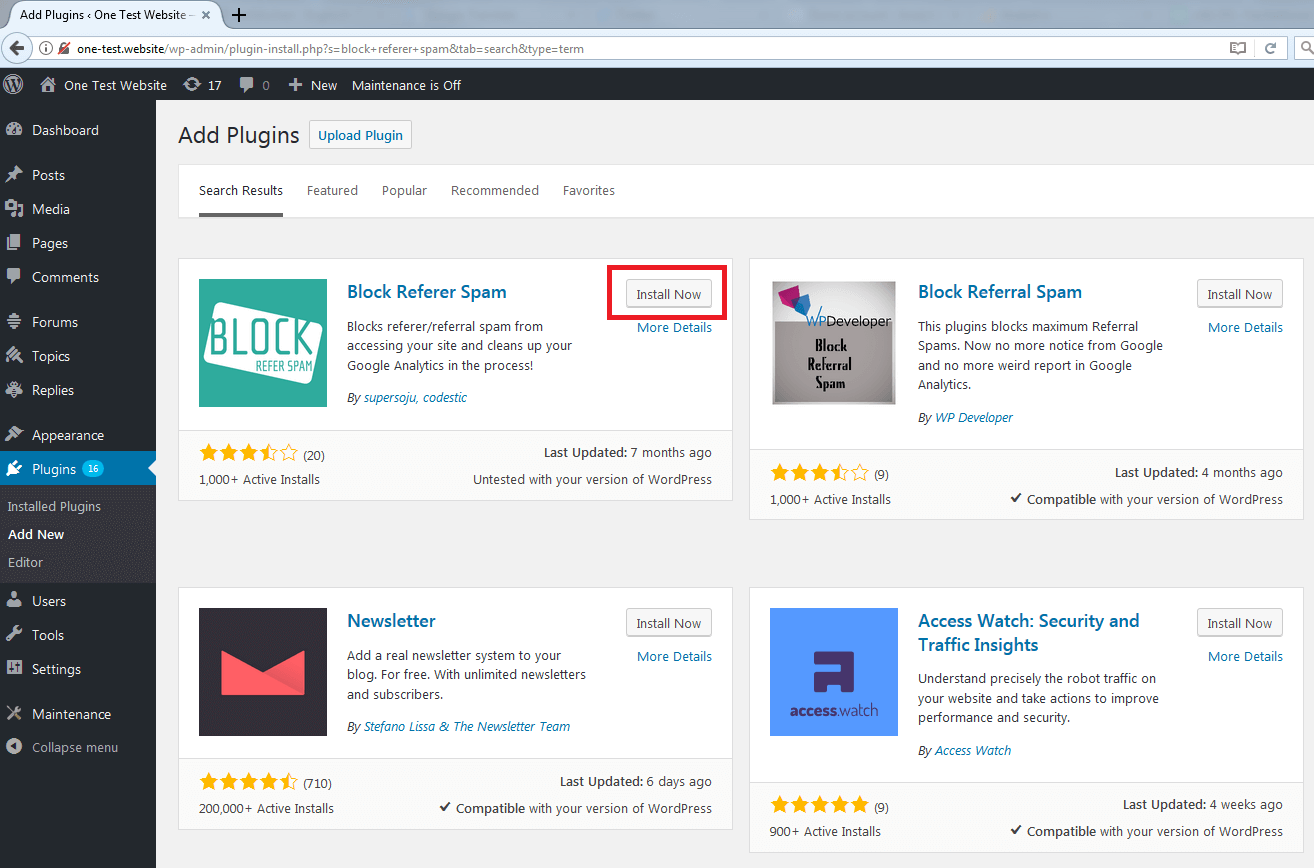
- Block Referer Spam from supersoju, codestic
- Stop Referrer Spam from Krzysztof Wielogórski
- WP referrer spam blacklist from Rolands Umbrovskis
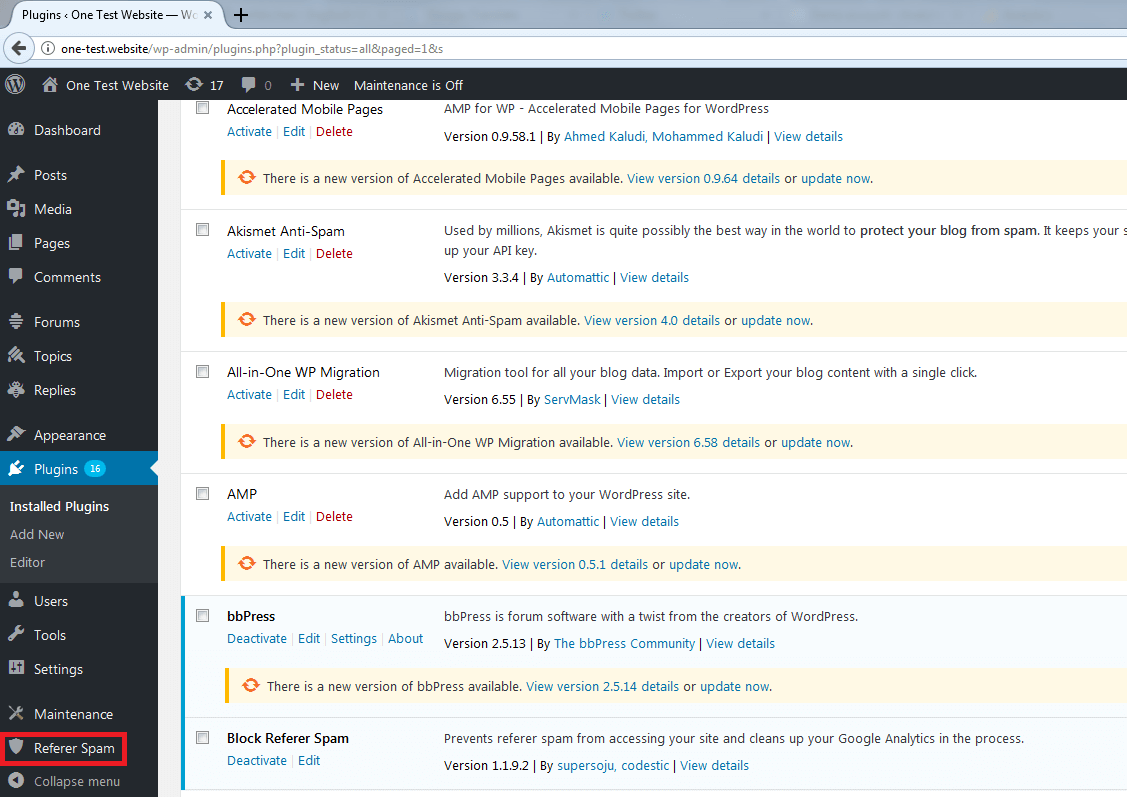
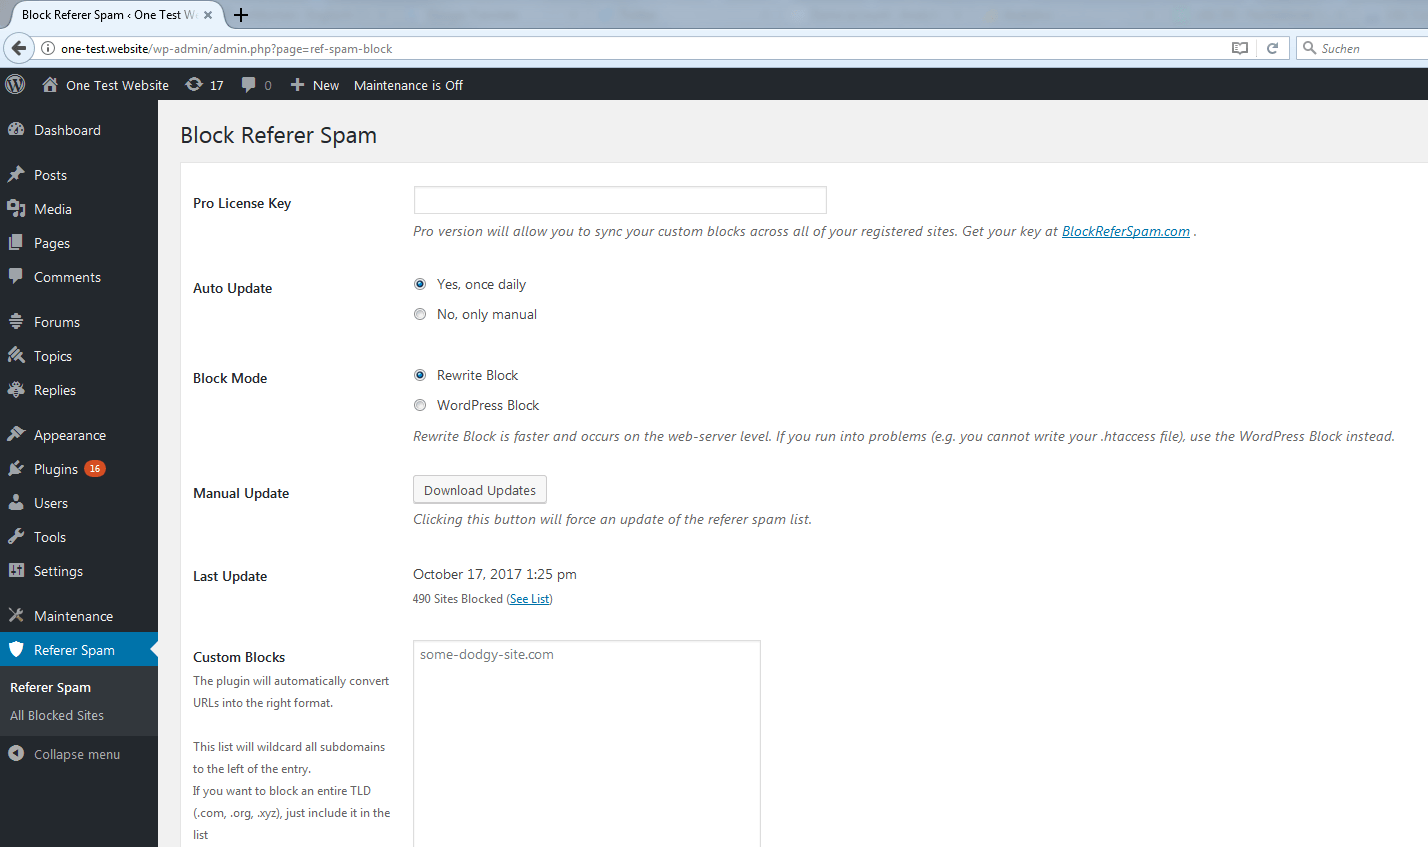
To illustrate how to install and configure WordPress plugins to prevent referrer spam, we will use Block Referer Spam as an example.
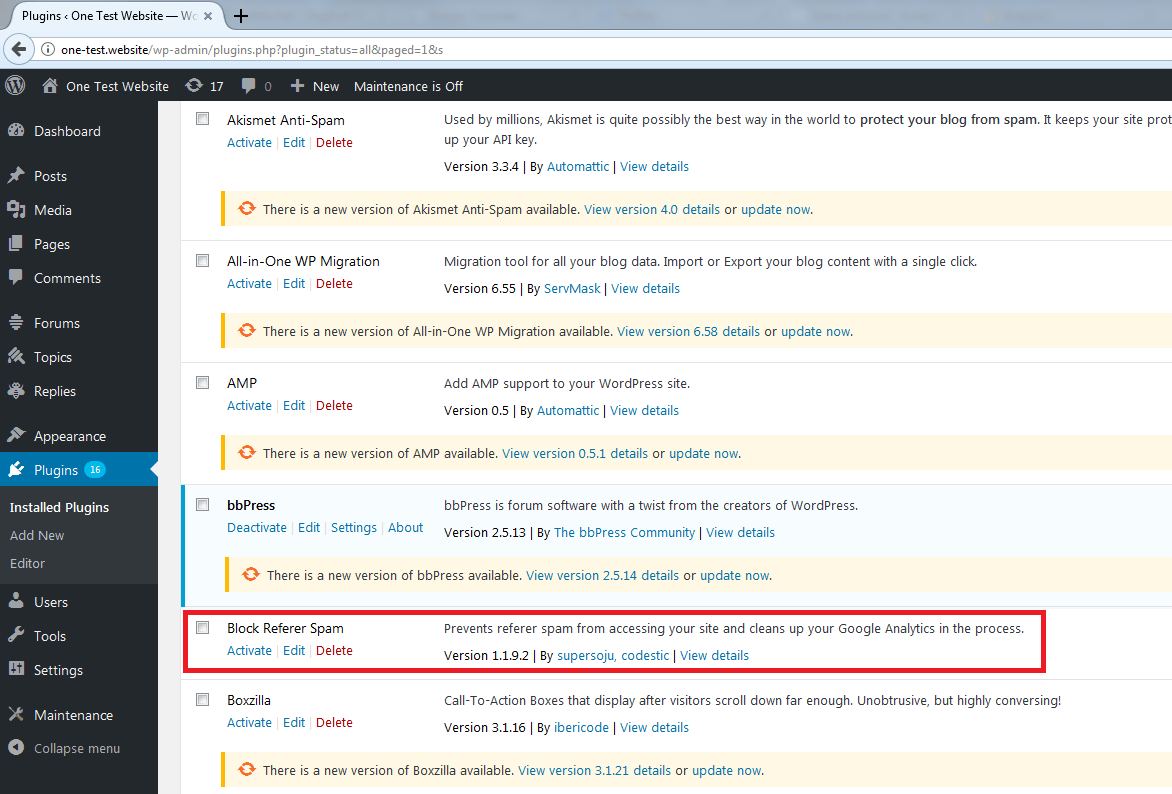
Install referral spam plugin
The content management system, WordPress, offers you the possibility of managing plugins directly via the software’s admin area. The following explains how to do this:
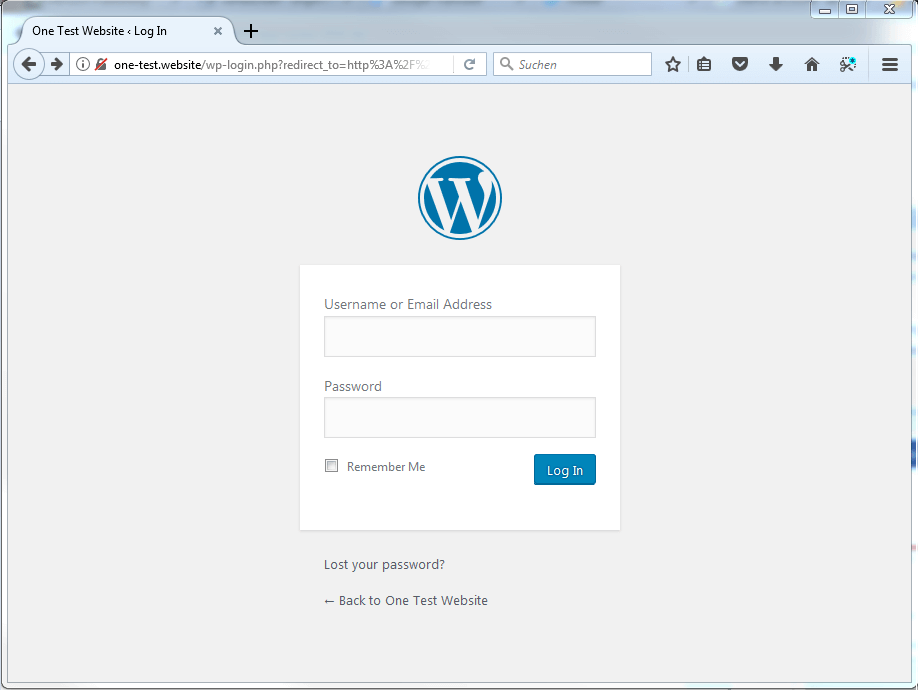
1. Open WordPress admin area: In order to enable the referrer spam plugin, log in to the admin area of your WordPress site.
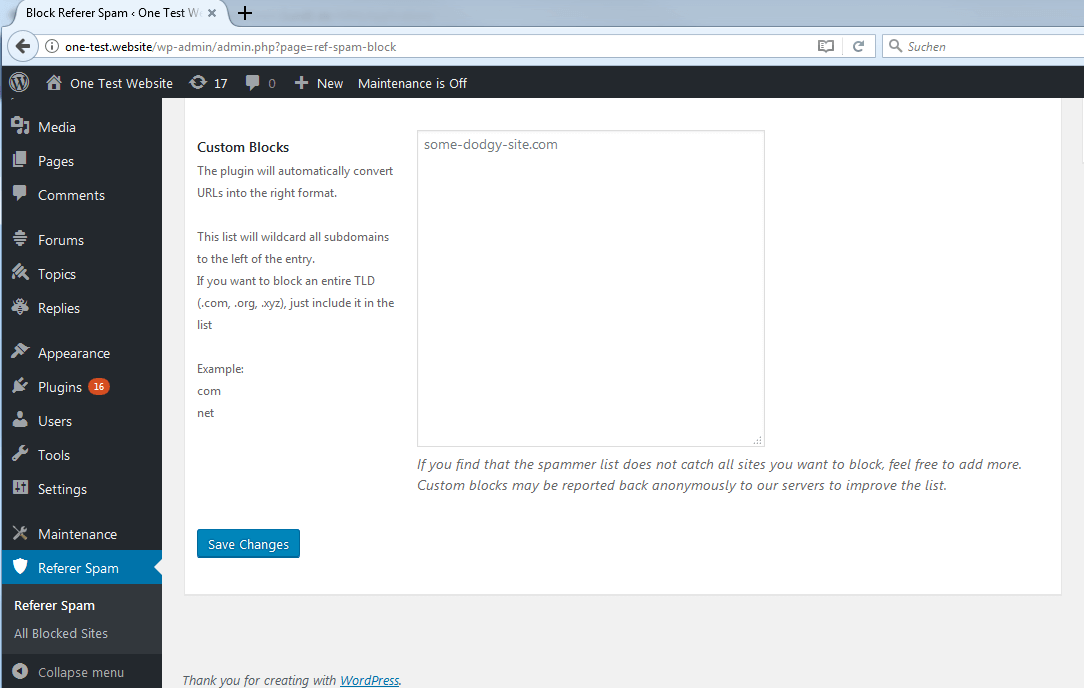
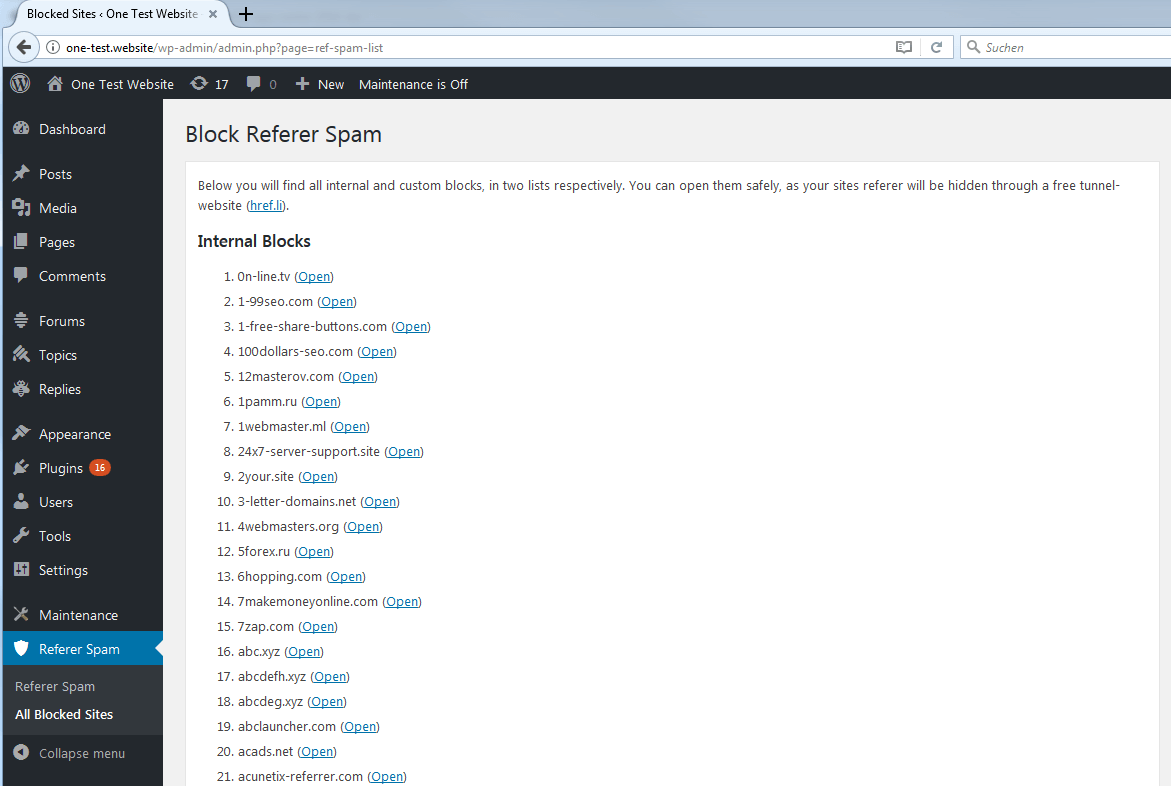
Configure referer spam plugin
Choose the automatic update option to ensure that the blacklist for the plugin is continually expanded with more spam addresses when they are discovered.
Select rewrite blocking if possible, in order to prevent spam access quickly and effectively on the web server level.
Ghost spam
Unlike crawler spam, Ghost spam does its job without interacting with the target site. Instead, it uses the Analytics Measurement Protocol, which allows people to send data directly to Google Analytics and add malicious information through it. This fake traffic mixes with real user data and is displayed to the website operator in the form of reports. Since this kind of attack doesn’t actually visit the website, it has been given the name: ghost spam.
The aim of ghost spam attacks is to attract the attention of website operators. Hackers rely on the curiosity of their victims. The idea behind it is that the more often your own URL appears in the analysis reports of other websites, the higher the chance that the operator will click on it to see where all this extra traffic is coming from. What’s hiding behind the referrer URLs are usually websites with display ads, which is how they make their money. In the worst case, operators of these spam websites use referral spam to infect computers with malware.
Using an example with Google Analytics, we show you how ghost spam works and what you can do to prevent this type of spam.
How does ghost spam work?
When it comes to ghost spam, hackers take advantage of Google Analytics’ measurement protocol. This helps to transfer traffic data between your website and the analysis tool’s web server.
All that hackers need in order to plant data in Google Analytics are valid tracking IDs. There are two ways to achieve this:
- Hackers use spam bots to crawl the HTML code of websites and to read out the IDs.
- Tracking IDs are created randomly using a generator.
Many website operators integrate Google Analytics’ tracking code directly into their website’s HTML code. The following code snippet is used:
<!-- Google Analytics -->
<script>
window.ga=window.ga||function(){(ga.q=ga.q||[]).push(arguments)};ga.l=+new Date;
ga('create', 'UA-XXXXX-Y', 'auto');
ga('send', 'pageview');
</script>
<script async src='https://www.google-analytics.com/analytics.js'></script>
<!-- End Google Analytics -->
In order for the script to transfer data to Google Analytics, the placeholder UA-XXXXX-Y must be replaced by the respective user’s individual tracking ID. This is accessible to any program that reads out the HTML code of correspondingly prepared websites.
To close these security gaps, use the Google Tag Manager. This provides website operators with a user interface that enables you to centrally manage code snippets from Google (known as tags). Instead of various tags for different Google services, only one code snippet for the Google Tag Manager is integrated into the HTML code. The tracking code for Google Analytics (including the individual ID) is protected against any third party access attempts.
Ghost spam can affect any Google Analytics report. In addition to the referrer information, hackers use reports about top events, keywords, landing pages, or language settings to plant manipulated traffic data.
Russian Vitaly Popov has been very successful in the field of ghost spam. The hacker has been able to implant his own websites’ URLs into Google Analytics accounts since 2014. At the end of 2016, the hacker fooled the net community with a supposedly secret Google page. In addition to the classic abbreviations like en-gb, fr, es, etc. thousands of Analytics users also found the following messages in their language settings:
'Secret.ɢoogle.com You are invited! Enter only with this ticket URL. Copy it. Vote for Trump!'
But curious website operators who followed the invitation did not end up on Google’s site. This was because:
ɢoogle.com ≠ Google.com
redirected visitors instead to Popov’s website, whose URL contained almost the entire text of the Pink Floyd hit Money from the 1973 album The Dark Side of the Moon.
http://money.get.away.get.a.good.job.with.more.pay.and.you.are.okay.money.it.is.a.gas.grab.that.cash.with.both.hands.and.make.a.stash.new.car.caviar.four.star.daydream.think.i.ll.buy.me.a.football.team.money.get.back.i.am.alright.jack.ilovevitaly.com/#.keep.off.my.stack.money.it.is.a.hit.do.not.give.me.that.do.goody.good.bullshit.i.am.in.the.hi.fidelity.first.class.travelling.set.and.i.think.i.need.a.lear.jet.money.it.is.a.secret.%C9%A2oogle.com/#.share.it.fairly.but.dont.take.a.slice.of.my.pie.money.so.they.say.is.the.root.of.all.evil.today.but.if.you.ask.for.a.rise.it’s.no.surprise.that.they.are.giving.none.and.secret.%C9%A2oogle.com
The URL led visitors to a website in the style of a web catalogue from the early 2000s with links to diverse search engines and online shops. Today the URL doesn’t lead anywhere. The motives behind Popov’s spam attacks are unclear. Perhaps the hacker was only trying to test the deceptive potential of the typosquatting URL, ɢoogle.com.
Summary: Ghost spam is annoying but it doesn’t pose a threat to your website. Fake traffic doesn’t result in real website visits and neither your server nor the log files are burdened by these automatic queries. However, ghost spam can be problematic if you want to analyse website statistics via Google Analytics.
Avoid clicking on unfamiliar referrers in the web browser. Otherwise, your system could become infected with malicious software from the link target.
Identifying ghost spam
Ghost spam is usually based on randomly generated tracking IDs. The spam bot doesn’t know which website is affected by the attack. This is reflected by inconsistencies in your Google Analytics data.
If a legitimate user tries to access your website via a link, the header of the request in the HTTP field 'host' will contain a hostname that can be assigned to your network.
Bots that send fake traffic, however, do not know these hostnames and fill the host field with a randomly selected placeholder. Alternatively, the field remains blank and Google Analytics records the host as '(not set)'.
Use this scheme to identify ghost spam in your Google Analytics account. The following procedure is recommended:
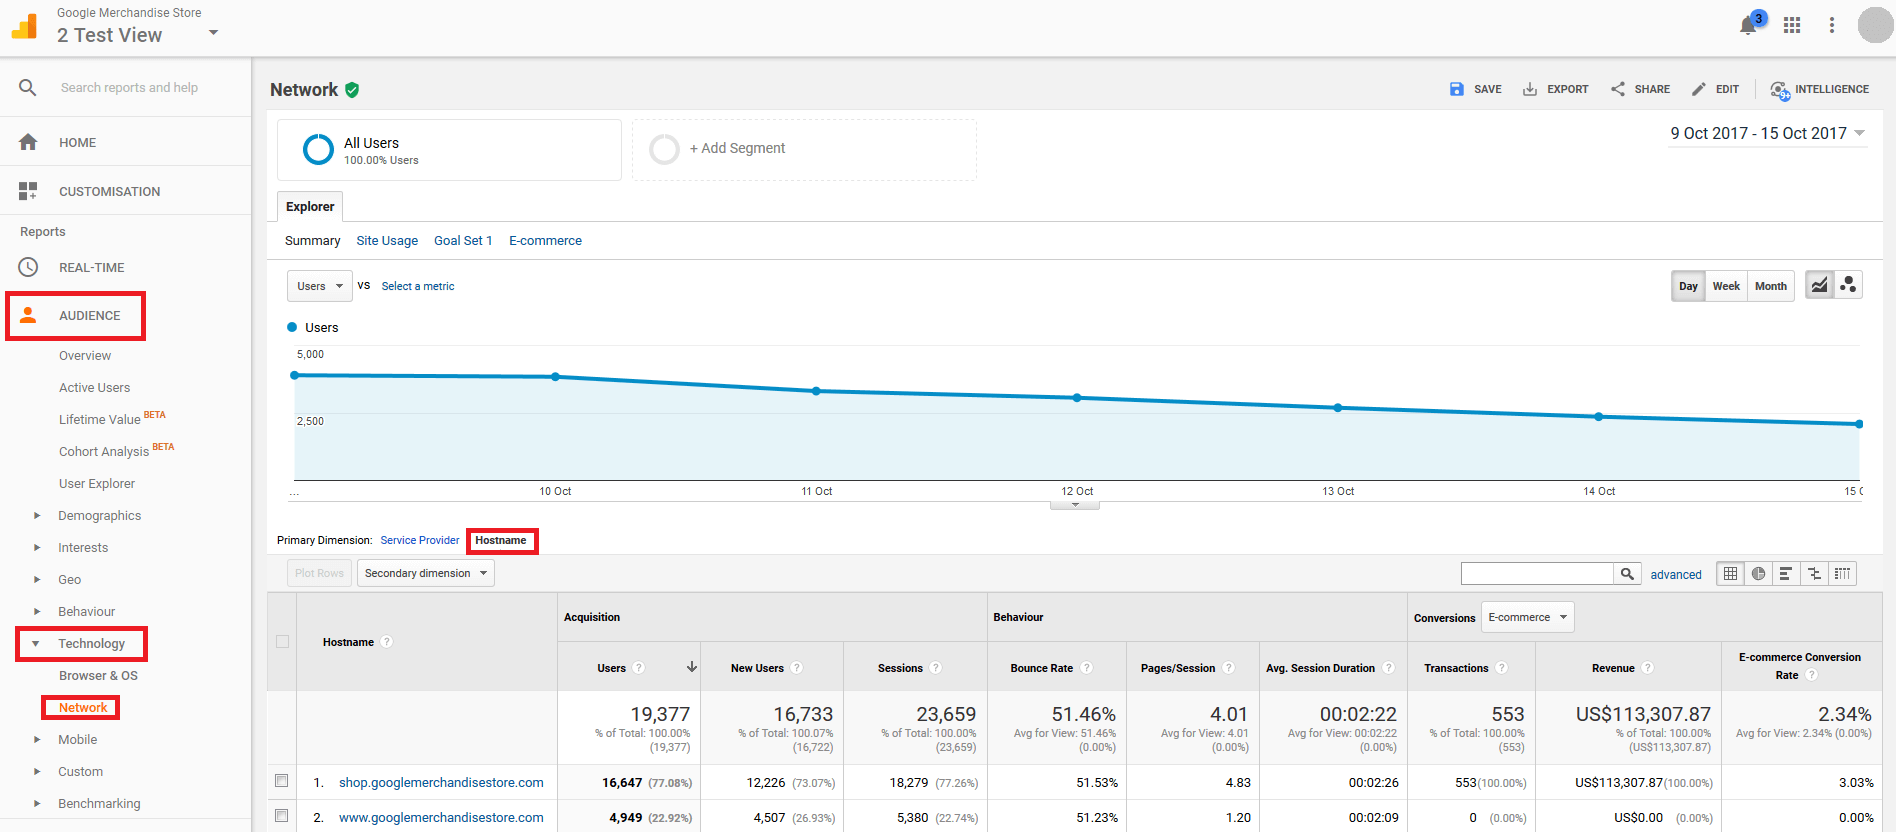
1. Access the network report: Go to 'Audience' > 'Technology', then click on 'Network' and finally select 'Hostname' in the primary dimension section.
2. Set the observation period: Set the observation period to the last three months.
3. Identify legitimate hostnames: In the first column of the report, Google Analytics will show you all the hostnames i.e. the websites that your visitors came from. You should see names that can be assigned to the domains that your site is available through. In addition, you will find Google domains that are responsible for translations and web cache versions of your website.
translate.googleusercontent.com
webcache.googleusercontent.com
If you find other computer names that do not correspond to your domains or the Google support pages in your network report, these will be ghost spam.
4. Create regular expressions: Make a note of all hostnames (that you want to evaluate traffic data for) in the form of a regular expression. For example:
^(www\.)?(example|googleusercontent)\.com
You will need this later as a filter pattern. Make sure that the regular expression includes all hostnames whose traffic you want to analyse via Google Analytics.
Ghost spam can be recognised by the fact that the host specified in the HTTP request does not match the host on your network.
Filtering out ghost spam
In order to filter out ghost spam from your Google Analytics account, simply filter out all hostnames that are not part of your network. Use the data display to achieve this:
1. Select a copy of the data display: In the admin area of your Google Analytics account, you can create a copy of the display, or simply choose the copy you made previously.
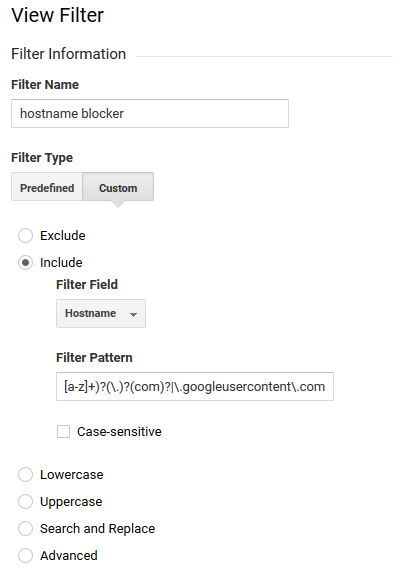
2. Define a filter: Select the menu item, 'Filter' and create a new filter, which you can then give an optional name such as hostname blocker.
Under 'Filter Information', make sure the following settings are selected:
- Filter type: 'Custom'
- 'Include'
- Filter field: 'Hostname'
3. Verify filter: Click on 'Verify filter' to test how your filter affects the selected display, then click on 'Save'.
4. Apply the filter to the main display: if your filter works as desired, transfer it to the main data display.
All user data transmitted via ghost spam should now be hidden. Now nothing is standing in your way when it comes to evaluating your website’s traffic.

